Further equipment
Tripod: Manfrotto 055ProB (modified)
Weight of modified version: 2185g, height fully extended: 135cm, collapsed: 60cm
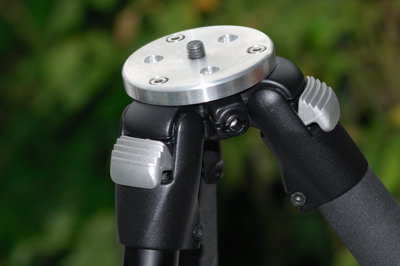 The Manfrotto 055ProB (or the recent 055XProB) is the tripod that everybody recommends when it comes to a solid “first” tripod and for many or most people it is all they ever need. The regular version that you can buy in the shop comes with a center column that offers further extension. I removed the center column to gain additional stability and due to the fact that I don’t need further extension due to the high tripod heads that I use.
The conversion was done with a conversion set that can be bought here in Germany via a website which deals with the detailed description of tripods. From time to time a conversion set pops up on ebay, too.
The removal of the center column reduces the weight from 2,4kg to less than 2,2kg and adds stability. Nevertheless I would recommend the tripod only up to focal length of 300mm. At 400mm the tendency for vibrations becomes more obvious.
If you are an average DSLR user with cameras up to a D300/D700 and with lenses of less than 400mm this tripod is recommended even without modification.
Tripod: Berlebach (older model, similar to today’s “Reporter 8023”)
Weight: 2570g, height fully extended: 143cm, collapsed: 74cm
This nicely-made tripod of east german vintage is the predecessor of today´s Reporter tripod series made by the company Berlebach in Mulda. Further review coming soon.
Monopod: Manfrotto 685B Neotec
Weight: 975g, height fully extended: 170cm, collapsed: 74,5cm
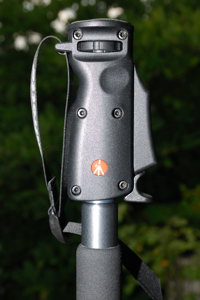 The 685B is a revolutionary design for a monopod which allows rapid height changes. No levers or clamps are to be tightened to extend or collapse the monopod. Manfrotto calls the construction “Neotec”. Right now this monopod and one very expensive tripod is available with this technology. The 685B is already the second incarnation of this type of monopod, taking care of some lacking details of the predecessor 684B.
The handling of the 685B is a breeze and it solves all the problems I had with the 680B in situations were I needed to change the height of the tripod dynamically. To increase the length of the monopod you simply pull at the end and the two extension sections slide out of the tube. To lower the monopod all you have to do is to unlock the grip at the top with the little finger of the left hand and then depress the grip to release the locking mechanism. As long as the locking mechanism is released it is possible to reduce the height of the monopod by applying downward force. At fist I was sceptic about a monopod that essentially locks itself without the need to tighten any clamp or screw. But the performance of the monopod convinced me that there is no need to worry. Even under high pressure the monopod does not collapse and Manfrotto claims that the locking intensity gets higher the more force is applied.
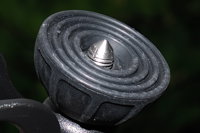
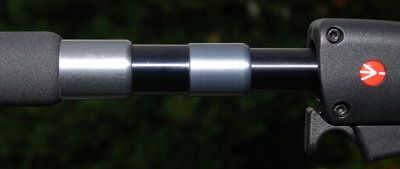 The load rating of 8kg seems realistic. All tubes are made of metal, only the pistol grip is made of plastic. There is no screw in the mounting base to secure a head like on some tripods. The foot of the 685 is a half-shell like rubber which allows panning and tilting. The rubber can be screwed back to expose a spike that can be useful on slippery ground.
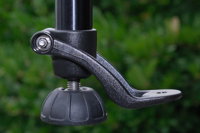 Some nice changes and additions have been made compared to the earlier 684B: The foot has now an additional footstep to secure the monopod on the ground. this is extremely useful when you want to extend the monopod. Simply step on the foot and pull the monopod upwards. The footstep can be tilted upwards to get out of the way. The locking lever of the pistol grip was also added with this newer model to prevent accidental collapsing.
 And as usual: Where’s light, there’s shadow! Despite the benefits and the relatively high price tag this monopod comes with there are some downsides which are related to the Neotec construction. The legs are not secured against rotation which is quite a difference compared to the 680B. When carrying the monopod with the camera mounted on top I now have to make sure that the top assembly doesn’t swivel around uncontrolled. Panning should be done via the monopod foot only because strangely the monopod looses height when you twist the tubes against each other. It doesn’t matter in which direction you turn the Monopod barrels; in each direction you will notice a downward spiral-like movement. I think this is the biggest weakness of the 685B, but with practice it should become second nature to do panning via the foot only.
If you are OK with only to be able to change the top portion of the monopod very rapidly check out the Manfrotto 334B. The two lower sections are locked by a screw-mechanism and only the top extension is controlled by a pistol grip. It is quite a bit cheaper and lighter.
Monopod: Manfrotto 680B
Weight: 760g, height fully extended: 153cm, collapsed: 51,4cm
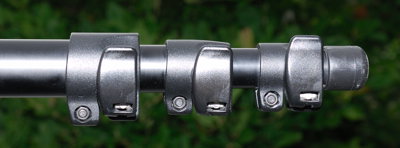 The 680B is a sturdy monopod with a load rating of 10kg which is a bit conservative. The monopod offers no fancy functions. Due to the construction with 4 tubes it is rather compact when collapsed. The locking is done via traditional quick-release clamps and the legs are secured against rotation. It is an ideal monopod for travelling with a sturdy construction which leaves nothing to be desired. Alternatively there is also the 681B with offers a higher load rating and higher extension.
—
A good tripod head is as important as the tripod itself. Besides specialized heads like panorama-heads there are mainly two types of tripod heads: 3-way heads and ball heads. I use both types for different needs. Right now I only use heads from Manfrotto, equipped with the proprietary hexagonal quick-release plates from their “RC0” system.
Ball head: Manfrotto 488 RC0
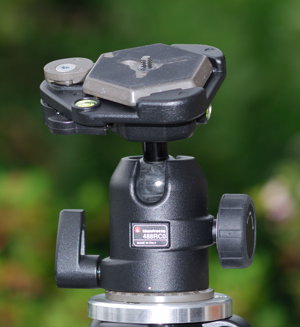 Weight: 755g, height: 13,4cm
The 488 ball head is available with different quick release mechanisms or with a simple 3/8″ screw. After using the RC2 quick release system for two years I recently settled for the more sturdier RC0 system with the hexagonal plates.
I use this 488RC0 head mostly on my monopods or on the 055ProB tripod when I want to travel light. The head features a separate panorama-lock and a friction control/lock wheel. It is possible to reduce the friction very nicely with the wheel, which makes this head ideal for the usage on a monopod. A bubble level and a safety mechanism against unlocking the hex-plate is integrated into the quick release clamp.
The load rating of 8kg is a bit optimistic as usual. I would not put more than 6kg on it, which should be more than enough for most lenses. Ball movement is smooth and the friction control does a very nice job. Overall the ball head is a joy to use and a good improvement over the 486RC2 that I used before.
Ball head: Manfrotto 268 (RC0)
Weight: 1535g, height from base to ground level of the camera mounting plate: 15,6cm, total 16cm
 This is a truly massive head. I think it is the biggest and heaviest ball head that Manfrotto ever produced. Right now Manfrotto has no ball head in the lineup that is as big and heavy as this one. It is intended for large format cameras and almost seems to be overkill for 35mm cameras. It is rated for 12kg load and this head should take the load without any problems.
The head features two levels at the side of the quick release mount, a panorama-lock and a friction control. The ball is locked through the big lever on the right, which can be turned up or down to lock the ball. The horizontal position sets the ball free, whereas this “free”-setting already has enough friction to hold a small to mid-sized camera/lens combination in place.
Operation of this head is good overall but there are some problems. As soon as the ball moves it does so without problems. But due to the relatively high friction extremely slow movement causes the ball to stick. As soon as you settle the ball to a certain position it becomes sticky in the current position. It is not possible to move the ball out of the current position without applying a higher amount of force. This leads to a slight bump when you start a new ball movement. In reality this is fortunately a minor problem, small movements in order to position the camera precisely are possible, it is just not as smooth as with more modern ball heads. If you are looking for a very stable ball head that can take high load this might be the best option for people on a budget.
Ball head: Manfrotto 168 (RC0)
Weight: 760g, height from base to ground level of the camera mounting plate: 13,2cm, total 13,8cm
 The smaller brother of the 268 ball head is quite large, too. Unfortunately the size does not translate in a faultless performance. The version pictured here is the older one without a safety lock for the quick release which is the only addition on the newer version, which features a black ball instead of the shiny metal.
Movement is not as smooth as with the 268 but the ball head has not the problem to become sticky once settled. Due to the relative low volume of the ball itself the head tends to change position (mostly in a downward direction) once locked. This phenomenon was long time associated with ball heads but is not an issue any more with more modern constructions. The levers to lock down the ball head are big and offer a firm grip, however I would not put more than a maximum load of 4 kg on the head.
3-way: Manfrotto 029 (RC0)
Weight: 1430g, height from base to ground level of the camera mounting plate: 15,6cm, 16,7mm total

This ia an older version of the 029 three-way head which is discontinued for quite a while. It is the smaller brother of the still available 229 head which forms the top of the product line (non-geared 3-way heads). The 029 head should be enough for any DSLR and even bigger lenses. The load rating of 7,5kg seems to be realistic.
The operation of the head is unproblematic, it is even possible to achieve different levels of friction with differing tension of the locking levers. The version that I use is the older one with hard-plastic grips and no safety-lock for the quick release plate. If you shop for a 029 make sure to get the modern version with shorter grips and safety-lock.
3-way: Manfrotto 141RC (RC2)
Weight: 950g, height: 13,4cm total
 This 3-way head is already replaced by a version made of plastic. This older version – which was current until 2006 – is made of metal like all other Manfrotto heads.
The load rating of 6kg seems a bit optimistic once more. The levers tend to stick a bit once tightened. Other than that the head functions as one would expect.
Every photographer knows this problem: Due to changes of equipment or shooting style different bags are needed over time and sooner than you might like you will end up with a pile of bags that suit very different purpouses.
Due to the fact that I find myself in many different shooting situations ranging from trips that are of photographic nature to all day long walks at local happenings I rely on a few different types of bags. I only use Lowepro bags because I never had a problem with them and I feel quite comfortable using them. The only drawbag with theese bags is that they look like a photographers bag and everybody sees instantly that photo equipment is stored in them. However, there are certainly different approaches to deal with that:
Backpack: Lowepro CompuTrekker AW
The most needed bag of a photographer is a good backpack. I was looking for a backpack that still fits into the size limits for on-board luggage while still offering enough room for at least a camera body, one midrange lens, a macro lens, two tele lenses like a 80-200mm 2,8 and 300mm 4,0 and a flash.
The CompuTrekker AW offers enough space to hold all the above listed items and a bit more. It is strongly related to the MiniTrekker AW offering an additional compartment for carrying a (not too big) notebook. As nice as the notebook compartment is: My old Thinkpad with 15″ 4:3 screen does not fit. Instead I sometimes carry magazines or other paperwork in there. The capability to attach a tripod via strings to the back of the backpack is nice but not recommended for tripods that exceed a weight of 3 kg total.
Waistbelt-bag: Lowepro Offtrail 2
This waistbelt bag is a very important part of my kit. In situations where I know that I will have to walk a long distance or that I am “on the road” for the whole day this bag comes along. After a short period of time I don’t even know that the bag is even there; the weight distribution around the hip makes carrying a heavy zoom kit much easier.
The bag consists of a central portion which is shaped like the regular Lowepro Toploader bags. It has enough room for a D200 with attached battery grip and a mounted AF-S 28-70mm 2,8 (hood reversed). If aou have smaller lenses like a Tamron 17-50mm 2,8 mounted there is the chance that you can fit an additional lens like a Sigma 10-20mm in the bottom portion of the bag. I usually separate the camera/lens combo from the lens at the bottom through a divider taken out of my backpoack. At both sides of the central bag there are loops where additional lenscases can be attached. Lowepro delivers two lenscases with the bag which roughly equate to the size of a Lenscase 2. They fit either two primes stacked on top of each other or a zoom up to a size of a 80-200mm 4,0 AI-S. Wide angle lenses with a filter diameter of 77mm will not fit. Therefore I got an additional Lenscase 3 which is considerably larger and has enough room to hold a 80-200mm 2,8 with tripod mount or two wideangle zooms stacked.
Small bits and pieces like an additional battery, lenspen and a couple CF cards can be packed into two small compartments included in the top latch of the main bag.
The only downside of the Lowepro Offtrail 2 is the limited space available which in no way compares to a backpack. Nevertheless in the configuration as described above it is possible to carry the bulky zoom combo Sigma 10-20mm, 28-70mm 2,8, 80-200mm 2,8. When you replace the second Lenscase 2 with either a second Lenscase 3 or a Lenscase 1w made for wideangles it is even possible to carry the combo 14-24mm 2,8, 28-70mm 2,8, 80-200mm 2,8 together with the D200 with MB-D200.
Shoulder-bag: Lowepro Commercial AW
Quite a classic in the range of Lowepro bags and available for quite some time. The Commercial AW is the biggest shoulder bag the company offers and it comes in at least two different versions. One is intended for medium format photographers and the other one for 35mm camera owners. The bag itself is the same in both cases, just the included internal divider sets have different shapes and sizes.
My sample is an older “medium format” bag and at first I was a little disappointed because the divider set is really made for the bigger equipment with fewer but bigger compartments. I solved the problem by buying a second divider set – once again for medium format – and now I have enough dividers to work with.
It is very difficult to run out of room in this bag. The size allows to carry a huge amount of gear from A to B. It is not a bag meant to be lugged around even on medium distances. It is a bag that you pack at home, put in into your trunk and get it out once on location. Many different divider configurations are possible and therefore it would be fruitless to quote any sample configurations. I managed to pack 4 speedlights, 11 lenses from a small Micro Nikkor to a 80-200mm 2,8 and a D200 into this monstrum. A tripod can be attached to the top of the bag.

